
Phantom Battery Walkthrough
By Iron Nest Wiki Team · August 2026 · 12 min read
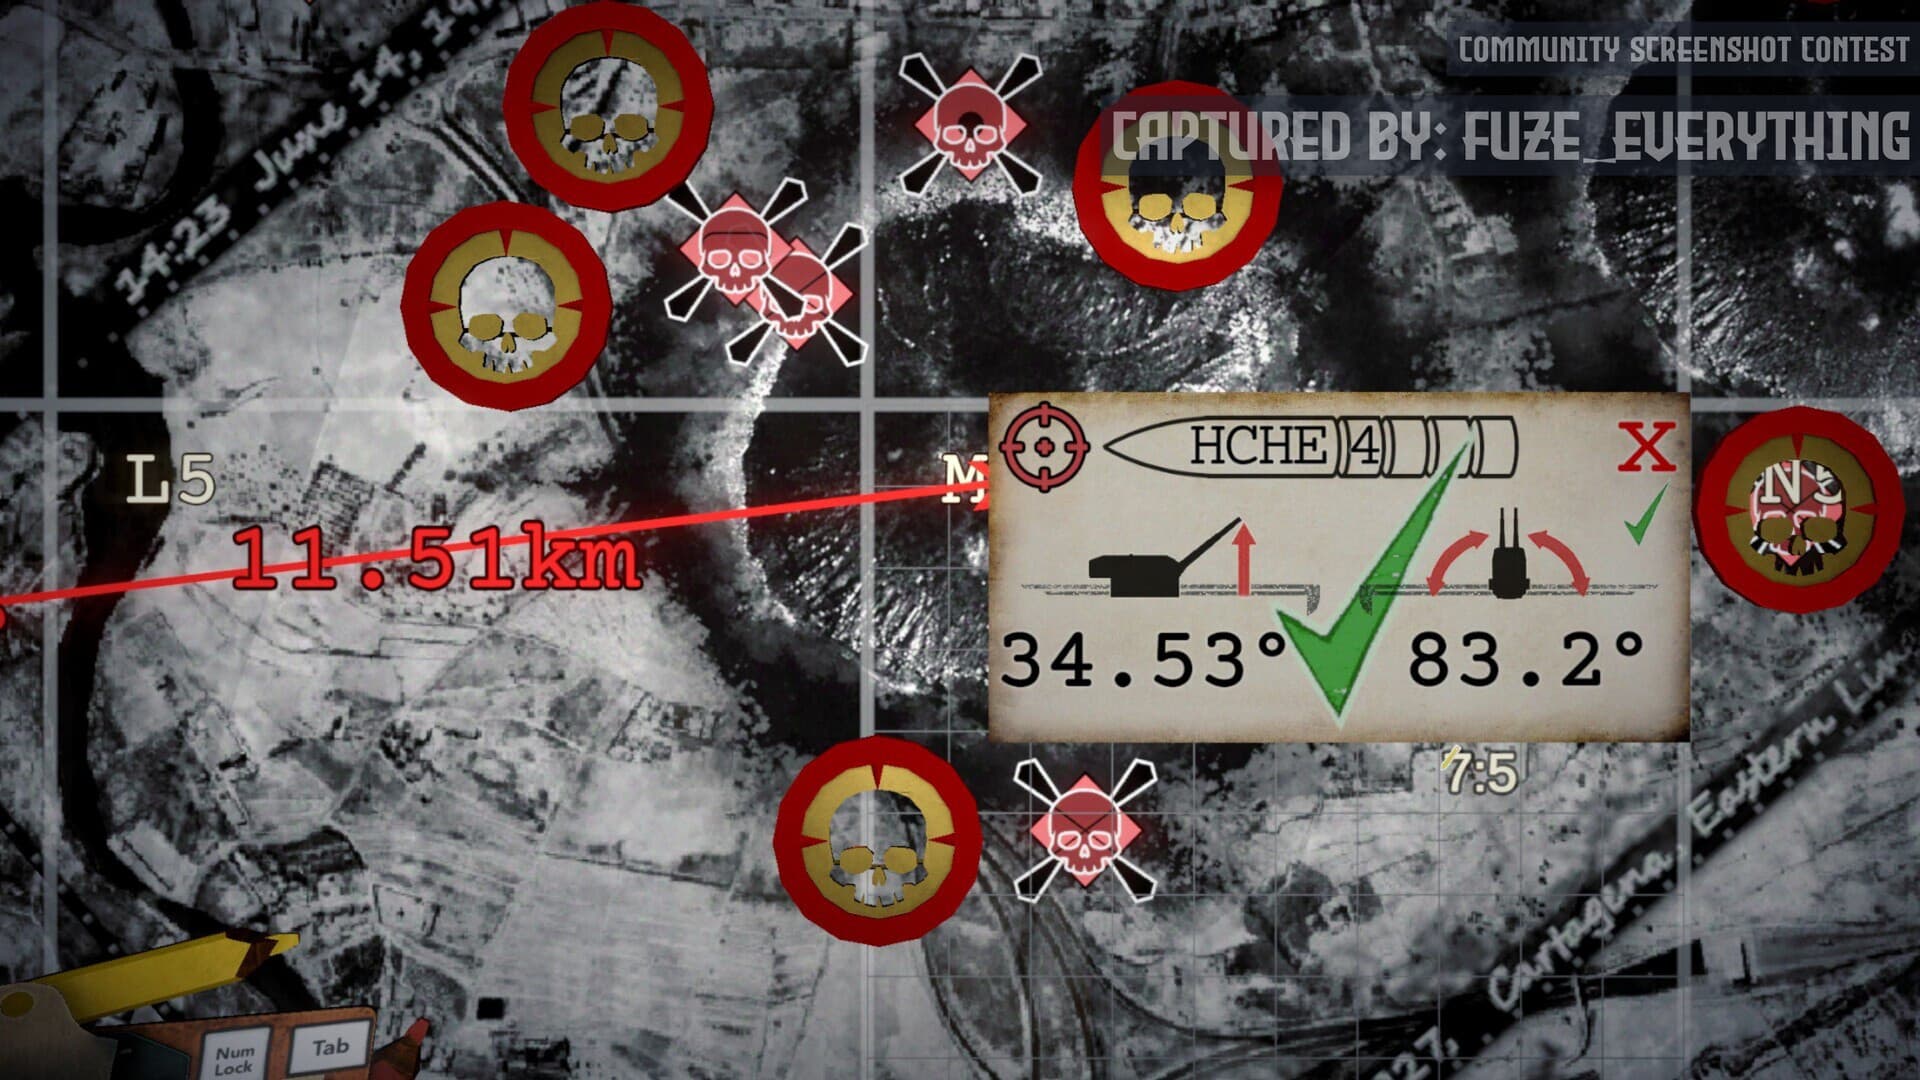
Mission 13: Phantom Battery is widely regarded as the most difficult mission in IRON NEST: Heavy Turret Simulator. Unlike previous operations where you hunt static targets, the Phantom Battery hunts you. The mission opens with Iron Nest already under fire, your engine disabled, and a Counter-Battery Timer (CBT) ticking down before the next enemy salvo arrives. You must restart your engine, execute an Emergency Move to an unknown location, find your own position from scratch, locate a mobile enemy battery that relocates after every hit, and destroy it before time runs out.
This guide provides a reliable route through the chaos. It covers the opening damage state, engine restart, unknown-location recovery, listening-post bearings, enemy spotter management, 90-second timer extensions, the mobile battery's repositioning behavior, and the final AP engagement that neutralizes the threat.
Something out there is answering shot for shot with Iron Nest. We are about to be destroyed. Emergency Move. Execute an Emergency Move immediately. How do we even know how to do that? Move Iron Nest. A distance in a specific direction. I don't even know where I am. How do I move?
Mission Overview
Phantom Battery gives you two separate problems at once: find the Phantom Battery, and keep rebuilding Iron Nest's own firing position after movement. The enemy battery is mobile, repositioning after each hit. Your own position changes after every Emergency Move. Both ends of the firing line can change, making this fundamentally different from the fixed-target Counter-Battery mission.
The mission deploys three fixed listening posts in your sector that collect bearings on the Phantom Battery when it fires. Enemy spotters scattered across the map provide a crucial resource: each destroyed spotter adds 90 seconds to the Counter-Battery Timer. Managing these spotters as time extensions is often the difference between success and failure.
Route at a Glance
- Restart the engine correctly (do not leave controls on starter position)
- Execute the required Emergency Move
- Read the new coarse relocation area
- Request enough Position Reports to recover Iron Nest's actual position
- Mark all three fixed listening posts
- Wait for the Phantom Battery to fire and generate fresh bearing reports
- Intersect those reports to get a current battery position
- Decide whether the timer allows a battery shot immediately
- If the timer is too low, destroy an enemy spotter for 90 more seconds
- Use AP once the battery position is confirmed
- Move again whenever the CBT becomes unsafe
- Delete every old Iron Nest firing line after movement
- Watch for mobile repositioning before firing at an old battery marker
- Rebuild both positions when necessary
- Finish the current battery position with a fresh AP solution
- Stop after the threat is neutralized
Phase 1: Restart the Engine
The opening attack puts Iron Nest into a damaged state immediately. On your first attempt, you may spend too long fighting the restart controls and then try to execute the move without being certain the engine is actually running. That run ends almost immediately.
The correct sequence is:
- Use the starter
- Get the engine operating normally
- Move the engine controls out of the start state and into RUN
- Confirm the Nest is actually running
- Then execute Emergency Move
Do not start repairing every minor damaged system before moving. The hostile battery is already engaging you. Your first priority is engine → movement → position, not engine → repair everything → organize ammunition → eventually move. The engine controls are the same system encountered in The Gorge mission, so experienced operators will recognize the interface.
Phase 2: First Emergency Move and Position Recovery
After the successful restart, your first move relocates Iron Nest somewhere inside a coarse grid area (e.g., R2). This is not an exact coordinate — it is only a coarse area. This distinction matters because you can already receive useful information about the Phantom Battery while still not knowing exactly where you are.
Critical rule: Knowing the enemy position alone is not enough to fire. You still need a valid Iron Nest-to-target line. After moving, immediately treat every old firing value as dead:
- Old turret bearing
- Old range
- Old charge choice
- Old elevation
- Old red firing line
You can keep fixed listening-post markers. You cannot keep a firing solution built from a firing origin that no longer exists.
Using Position Reports
A Position Report gives you a reference coordinate, a bearing from that reference toward Iron Nest, and a broad grid containing the Nest. One report creates a line of possible positions. Two reports provide the intersection needed for a precise new firing origin.
In one documented recovery, two independent Position Reports produced:
- Approximately 336° from A9 4:7
- Approximately 303° from B9 7:5
Their intersection gave a workable new Iron Nest position. Do not try to save requisition by choosing an arbitrary point and hoping the AP radius forgives it.The entire mission is built around precise counter-battery fire. A guessed firing origin defeats that purpose.
If the relocation data puts Iron Nest somewhere you cannot map reliably (e.g., near the map edge), do not pretend the edge is an exact firing origin. A short controlled move plus new reports is safer than spending another AP round from a guessed point.
Phase 3: Mark the Listening Posts
The mission deploys three listening posts in the sector. They are fixed reference points. Their job is to give you bearings when the Phantom Battery re-engages. Mark all three on the map before you start interpreting any battery report.
You do not need all three bearings every time. A clean pair of useful bearings can be enough. The mistake is drawing a battery bearing from Iron Nest — listening-post bearings begin at the listening post named in the report. That is the same origin rule used everywhere else in the campaign, but Phantom Battery makes mistakes much more expensive because the CBT is running while you solve them.
Phase 4: Locate the Phantom Battery
Let the listening posts find the battery before you guess. In one engagement, the battery re-opened fire and the listening posts began producing fresh bearings. One report included a bearing around 258° from its listening post. Once another useful constraint was added, the two lines produced a believable crossing.
This is where you make the first big mission decision:
- If the battery point is clean and you have enough time: Build the firing solution immediately
- If the battery point is still weak: Wait for another useful report instead of spending AP on a guess
- If the timer is already too low: Switch priorities and kill an enemy spotter for more time
That last option is what makes Phantom Battery different from a simple “find the intersection and shoot” puzzle. Time management is as important as geometry.
Phase 5: First Battery Shot and AP Requirement
One first confident battery solution produced approximately:
- 287.5° bearing
- 3 charges
- Approximately 42.54° elevation
The shot reached the suspected Phantom Battery position. It did not finish the mission. Instead, the target state made it clear that the position required a precise armor-piercing follow-up. Once the target is confirmed as an AP problem, stop experimenting with wider destructive shells and prepare the precise follow-up.
Buy AP when you have:
- A current battery location
- A current Iron Nest location
- Enough time to construct the final shot
Do not buy AP when the mission starts, when you first see a vague bearing, or while you still have two possible intersections. That ordering matters because the Phantom Battery can move before you use the shell.
Phase 6: Enemy Spotters as Time Extensions
The opening orders give one of the most useful numbers in the mission: each destroyed enemy spotter adds 90 seconds to the Counter-Battery Timer.Treat those spotters as a time resource. Do not automatically clear every spotter before touching the Phantom Battery — that wastes the information advantage you already have when the battery itself is well located.
Shoot a spotter when:
- The battery has repositioned and you need time to find it again
- Emergency Move forced you to rebuild your own position
- The timer is too short for another full AP calculation
- A spotter is already well located and cheap to remove
During one recovery, two known spotters were prepared across the two guns so they could be removed quickly rather than handling them one at a time. The purpose was not simply extra kills — it was buying enough time to solve the moving battery again. This is the decision that keeps the mission under control: Battery position certain + enough time → shoot battery. Battery uncertain + timer collapsing → shoot a spotter.
Phase 7: The Mobile Battery Trap
This is the biggest trap in the mission. After you finally have a good battery position, prepared AP, moved, rebuilt your own position, and fired again, the expected target may no longer be there. The reason: the Phantom Battery is mobile. Later reports explicitly describe it as repositioning.
One attempted follow-up used approximately:
- 300.2° bearing
- 4.04 km range
- 2 charges
- 24.24° elevation
The card itself was internally consistent. The problem was the target — the battery was still moving. When a well-built AP shot misses a mobile Phantom Battery, do not immediately assume calculator error, wrong charges, wrong AP shell, or broken gun. First ask: Was the target still at that marker when I fired? If the latest message says repositioning, stop using the old target point.
When to Wait Instead of Firing
Once the battery is mobile, firing faster is not automatically better. Wait when:
- The last report explicitly says the battery is repositioning
- Only one fresh listening-post bearing is available
- Your target marker is still based on the previous firing position
- You just executed Emergency Move and have not recovered your own location
- The AP shot would be based on two stale assumptions at once
Fire when:
- Iron Nest's position is current
- The battery's latest position is supported by fresh information
- No mobile update has invalidated it
- The timer still covers loading and shell flight
The expensive mistake is trying to solve uncertainty by firing more AP rounds. Phantom Battery rewards current information, not volume of fire.
Phase 8: Final AP Engagement
The final successful engagement only happened after stopping the practice of carrying old solutions forward. You need a current Iron Nest position, a current battery point, AP loaded, and enough time left to finish the setup.
In one documented final engagement:
- 277.4° bearing
- 2 powder charges
- 27.72° elevation
Both gun controls were prepared around the same confirmed solution before the shot. Reusing either stale endpoint had already caused misses earlier in the mission. The hit destroyed the Phantom Battery and command confirmed the threat was neutralized.
That is the point where you stop. Do not continue clearing every remaining hostile icon simply because extra targets may still exist. The mission is about hunting the opposing battery. Once it is gone, the required problem is solved.
Phase 9: Controlled Movement When Lost
One later Emergency Move created a strange problem: the reports put Iron Nest somewhere around M1, but plotting the information made the position appear to fall beyond the useful map edge. Rather than build a firing solution from a point you do not trust, use a controlled movement.
Move Iron Nest roughly 2 km in a known direction (e.g., north). That brings the firing origin back into a part of the map you can work with. Then request fresh positional information. One recovery used distance constraints around 3.72 km from P1 9:5 and 1.36 km from L1 7:9, which converged on the new firing position.
The reusable lesson: If the relocation data puts Iron Nest somewhere you cannot map reliably, do not pretend the edge of the map is an exact firing origin. A short controlled move plus new reports is safer than spending another AP round from a guessed point.
Common Mistakes That Cost Entire Attempts
- Starting Emergency Move before the engine is actually running: Finish the restart and leave controls in the running state first.
- Treating the coarse grid as an exact coordinate: R2 is an area, not a point.
- Trying to solve only the enemy position: A perfect battery marker still cannot produce a firing solution when you do not know your own current position.
- Drawing listening-post bearings from Iron Nest: Each bearing begins at the named listening post.
- Buying AP before the battery position is defensible: The battery can relocate while you are still solving the map.
- Chasing spotters while the battery is already exposed: Spotters buy time. They are most useful when you actually need more time.
- Ignoring the 90-second extension: When the timer is too low for another full solution, a known spotter can be more valuable than a rushed battery shot.
- Firing at the previous battery marker after a mobile update: The old point can be mathematically perfect and tactically useless.
- Assuming a missed AP means AP is wrong: In one attempted shot, the battery had simply moved away from the solved point.
- Keeping old firing lines after Emergency Move: The target may remain valid, but the bearing and range from Iron Nest do not.
- Guessing an off-map firing origin: If positional reports produce a point you cannot reliably use, reposition and request new information.
- Waiting until the last few seconds to move: Emergency Move is useful only if you survive long enough to execute it.
Speedrun and Advanced Strategies
Experienced operators have developed several advanced techniques for Phantom Battery:
- Double volley technique: Load both barrels with AP and fire simultaneously. The CBT timer pauses while shells are in flight, giving you time to prepare the next solution.
- Forward Observer exploitation: Each destroyed Forward Observer nets 50 requisition points — nearly enough for one Emergency Escape. Two quick Observer kills can fund an escape plus AP shells.
- Recon plane timing: Send a recon plane from F1 to F10 (or along the big red ? path) immediately after the first Emergency Move. This can reveal the Phantom Battery's location before listening posts generate bearings.
- Manual move verification: After Emergency Move, use a regular manual move (0.5 km at bearing 0.00°). The typewriter will report your new position, giving you a verified starting point for calculations.
Known Bugs and Workarounds
The developer has confirmed a bug affecting mission replays: if you replay the same mission, timers involved can get corrupted, making the mission go from “hard but achievable” to “impossible.” A fix exists on the test branch and should be pushed to live. To access the fix: open Steam library, right-click IRON NEST, select Properties, click the Betas tab, and choose “Testing.”
Completion and Achievements
The mission-completion achievement is Mirror Image — Hunt the Phantom Battery. The all-Gold achievement is Master Gunner — Earn gold on all medals in Phantom Battery.
Useful repeat-run priorities:
- Restart cleanly
- Avoid unnecessary Emergency Moves
- Use spotters as timer extensions rather than random side targets
- Do not waste AP on a repositioning battery
- Rebuild your own position correctly after every move
- Stop as soon as the Phantom Battery is confirmed destroyed
Frequently Asked Questions
Why is Phantom Battery so much harder than other missions?
Phantom Battery combines every difficulty mechanic in the game: damaged opening state, unknown self-position, mobile enemy, Counter-Battery Timer, time extensions through spotter kills, and the requirement to rebuild both ends of the firing line repeatedly. No other mission demands this level of simultaneous problem-solving under time pressure.
How many hits does the Phantom Battery take to destroy?
Community reports suggest 4 AP hits are required. Using both barrels simultaneously (double volley) reduces this to two firing cycles. HE shells are ineffective — the battery requires armor-piercing rounds.
Should I use Emergency Move after every shot?
Not necessarily. If the timer is safe and your position is current, stay and fire again. Move only when the CBT timer becomes unsafe or when you have stale coordinates. Unnecessary moves waste time and requisition.
What if I can't find the Phantom Battery at all?
Send recon planes along the path where the big red ? marker appears. If listening posts are not generating bearings, the battery may not have fired recently — wait for it to engage. Some players report the mission can bug and not provide intel; if this happens, restart the mission (not just the checkpoint).
Is there a minimum requisition strategy?
Yes. Buy only 2 AP shells initially. Use Forward Observers to generate requisition (50 points per kill). This funds additional AP shells and Emergency Moves without spending starting requisition. One documented successful run used this “cheese” strategy to overcome the tight budget.